How to Build an E-commerce Site with WordPress + WooCommerce + QBitFlow. Accept Crypto Payments in Under 30 Minutes.
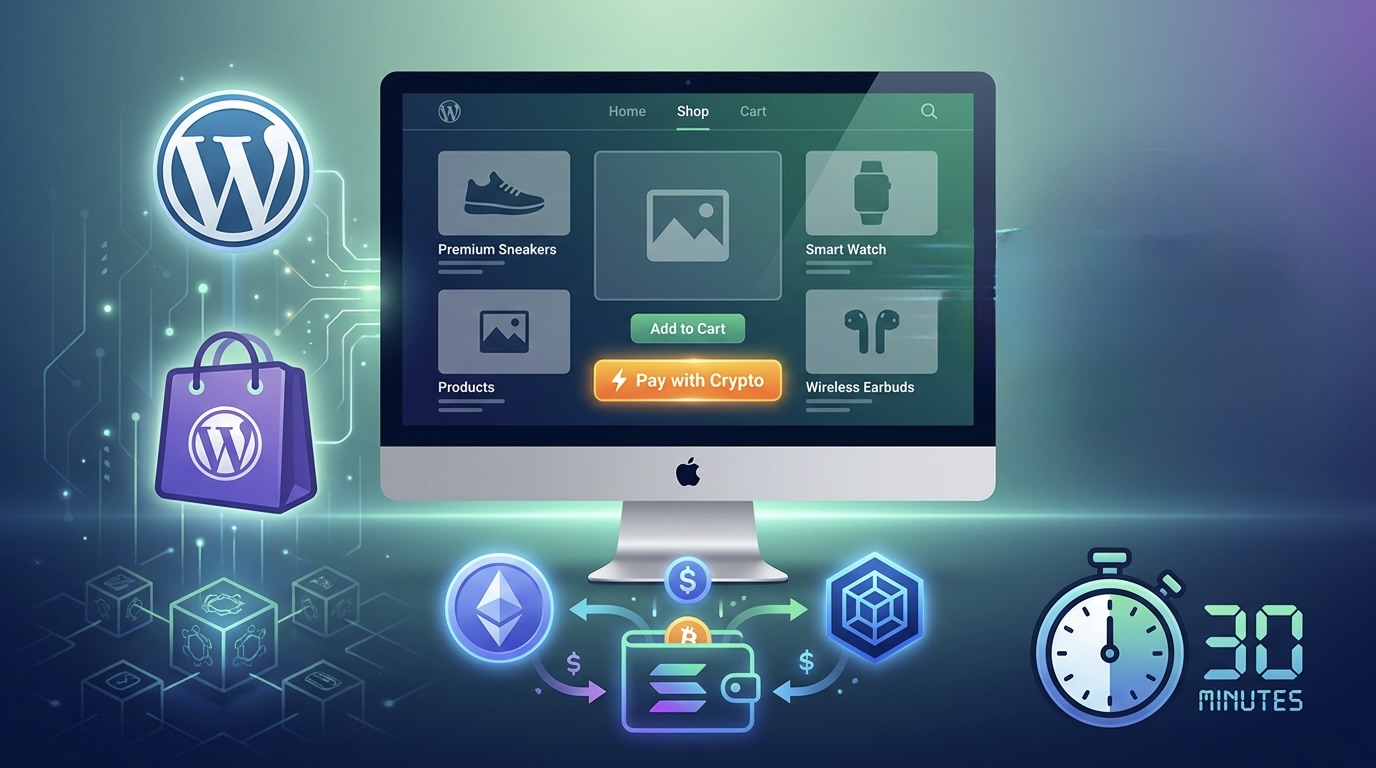
Accept crypto payments in under 30 minutes
This is a build guide, not a manifesto. If you run a WordPress store on WooCommerce and you want to add crypto as a payment option — alongside cards, not instead of them — this post walks through the full setup end to end. About 30 minutes from a fresh account to a live checkout that settles directly into your wallet.
Why crypto payments matter for WordPress sites in 2026
Crypto payments stopped being a thought experiment a few years ago. A handful of things changed in 2026 that made the math obvious for anyone running an e-commerce site.
Stablecoin volume crossed Visa-scale on multiple weeks this year. Meta started paying some of its creators in USDC. The EU's MiCA framework went fully into effect, which gave European merchants a real regulatory floor to stand on. Cross-border settlement that used to take three days through correspondent banks now lands in seconds for a few cents in network fees.
None of this means cards are going away. Cards still convert the majority of your customers, and for most stores they should stay the default. What changed is that crypto moved from "novelty" to "useful additional rail" — especially for:
- International customers whose cards get declined by your processor's fraud rules
- Merchants tired of chargebacks (crypto settlements are final)
- Anyone who wants funds in their own wallet within seconds, not in a processor's account for two weeks
- Sellers paying suppliers in USDC and wanting to receive payment in USDC to skip the conversion round trip
The point is not "replace cards with crypto." The point is "add a second rail that settles differently and costs less." For some segment of your customers, that rail is the one they actually wanted.
Why WooCommerce specifically
If you already run on WooCommerce, you know the pitch. If you are choosing a stack, here is the short version.
WooCommerce is the largest e-commerce ecosystem on the web — more than a third of online stores run on it. It is self-hosted, which means you own your data, your customer list, your product catalog, and your store. No platform can deplatform you because the platform is your own server. The plugin model lets you stack capabilities — payments, shipping, tax, subscriptions, memberships — without rewriting your stack every time a vendor changes their pricing.
For merchants who want to own their checkout, their data, and their payment rail, WooCommerce is the obvious base layer. QBitFlow plugs into the payments slot the same way Stripe or PayPal does — except settlement happens directly between the customer's wallet and yours, with no intermediate account holding the funds.
What you will have at the end of this tutorial
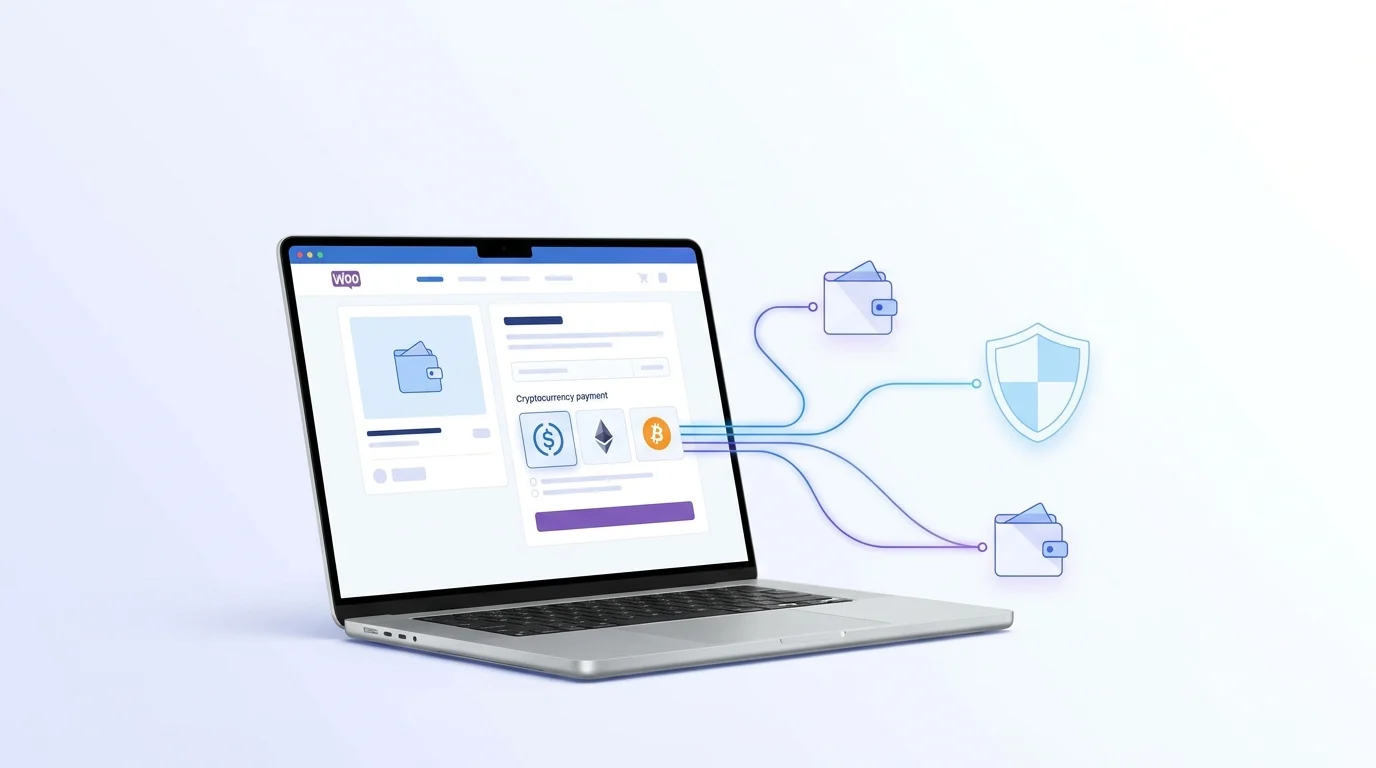
A working WordPress + WooCommerce store with crypto checkout enabled. Customers will be able to pay with ETH, SOL, or supported tokens (USDC, USDT, DAI, EURC, and others) across Ethereum, Solana, and Base. Settlement is non-custodial — funds move from the customer's wallet directly to yours on-chain. Fees are 1.5% flat per transaction. Setup time, from zero to first test payment, is roughly 30 minutes if WordPress and WooCommerce are already installed.
Prerequisites
Before starting, you need:
- A WordPress site. Any hosting works — WP Engine, Kinsta, SiteGround, Bluehost, self-managed VPS, whatever you already use. If you are starting fresh, pick a host with one-click WordPress install and come back when WordPress is up.
- WooCommerce installed and activated. Free plugin, available from the WordPress directory. Run through its setup wizard so you have at least one product configured.
- A crypto wallet. Public address only — Ethereum, Solana, or Base. Never share or paste a private key or seed phrase anywhere. If you do not have a wallet yet, MetaMask (EVM), Rabby (EVM), or Phantom (Solana) take five minutes to set up.
- An email and password for the QBitFlow signup.
- About 30 minutes of uninterrupted time. The flow is mostly clicking through forms, but you will want to be able to focus when configuring the API key.
Step-by-step setup
Step 1: Sign up at QBitFlow and connect your wallet
Go to qbitflow.app/get-started. Create an account with email and password.
Signup itself is a guided multi-step flow: create account → connect wallet → create your first product → run a test payment → done. The wallet step is where you connect your wallet that settled payments should land in. QBitFlow never asks for a private key or seed phrase at any point — the public address is all we need to route funds.
You can connect an Ethereum address (which also covers Base, since Base uses Ethereum addresses) and a Solana address. If you only operate on one chain, connect just that one.
New accounts get an automatic testnet faucet drop — small amounts of test funds appear in your wallet on the testnet chains so you can run end-to-end test payments before going live.
Step 2: Create a product (or skip, and use your WooCommerce products)
For most WooCommerce stores, you will let WooCommerce own the product catalog and just use QBitFlow as the payment rail. In that case, skip ahead to Step 3.
If you want to create a standalone product in QBitFlow (useful for one-off sales, donations, or services priced outside your WooCommerce catalog), the dashboard has a Products section. Click Create product, fill in name, price, and description. The product gets a stable product_id you can reuse across checkout sessions.
Step 3: Install the QBitFlow WooCommerce plugin
Two install paths. Pick the one that works for you today.
Path A — Install from GitHub (available today).
- Open the plugin repo: github.com/QBitFlow/qbitflow-woocommerce
- Click the green Code button → Download ZIP
- In your WordPress admin, go to Plugins → Add New → Upload Plugin
- Choose the ZIP you just downloaded and click Install Now
- Click Activate Plugin
That's it. The plugin is now active on your site.
Path B — Install from the WordPress.org plugin directory (coming soon).
The plugin has been submitted to the official WordPress.org plugin directory and is currently under review. Once it is approved, you will be able to install it the standard way:
- In WordPress admin, go to Plugins → Add New
- Search for QBitFlow
- Click Install Now → Activate
We will update this post the moment the directory listing goes live.
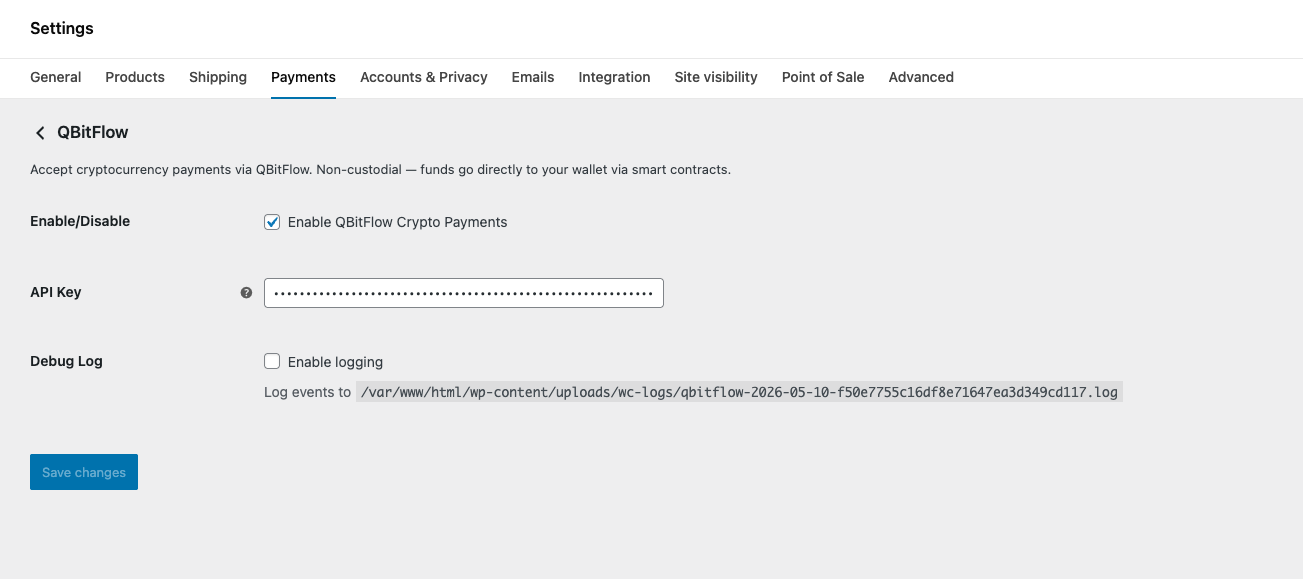
Step 4: Configure the plugin
In WordPress admin, go to WooCommerce → Settings → Payments. You will see QBitFlow in the list of payment methods. Click Manage (or the toggle to enable, then Manage).
Fill in the following fields:
- Enable QBitFlow — check the box.
- API Key — generated in your QBitFlow dashboard under Settings → API Keys. Click Create API Key, copy the value, paste here. Treat it like a secret — anyone with this key can charge against your account.
Save changes.
One note on API keys behavior: API keys are used to authenticate each request, and every key is bound to a mode when you create it — test or production. The two are not interchangeable: a test key only talks to the test environment, a production key only talks to live. Start with a test key and run the full payment flow against your store end-to-end (place an order → get redirected to the QBitFlow checkout → complete the payment → confirm the WooCommerce order flips to paid). Once you're satisfied, go back to the dashboard, generate a production key, and swap it in the plugin settings.
Quick way to confirm which mode you're on: validate an order in your store and let it redirect to the QBitFlow checkout page. If there's a test mode badge in the top-right of the checkout, the key you pasted is a test key. No badge = production. Check this once after every key swap so you don't ship a store that's still pointing at the test environment (or worse, charge real customers against a test key that won't settle).
Step 5: Run a test payment
With test mode ON and a product in your WooCommerce catalog, place a test order yourself:
- Open your store in an incognito window
- Add a product to cart and proceed to checkout
- At the payment step, select QBitFlow as payment method
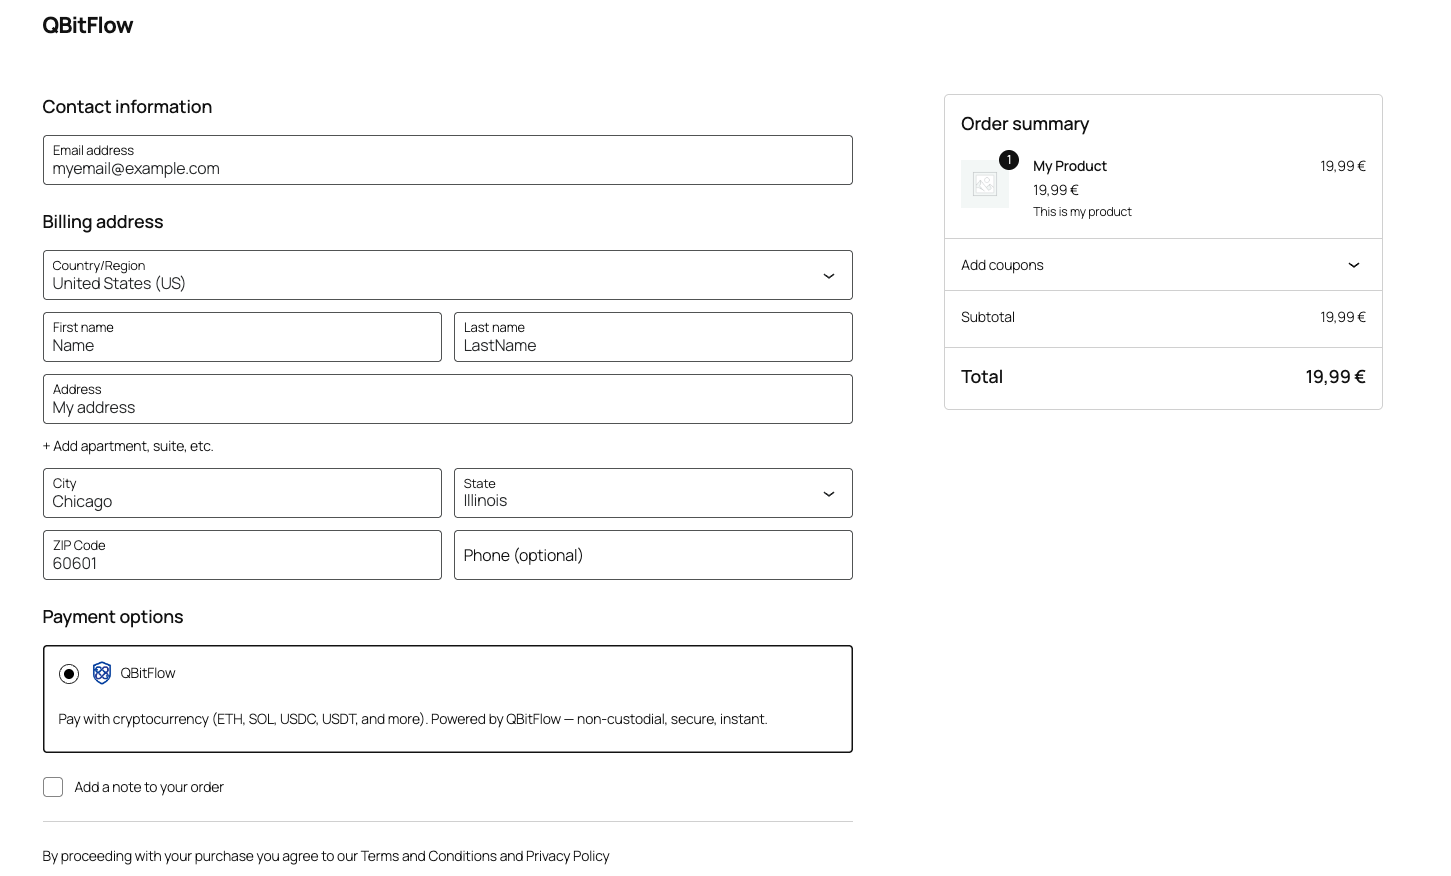
- You get redirected to the QBitFlow hosted checkout
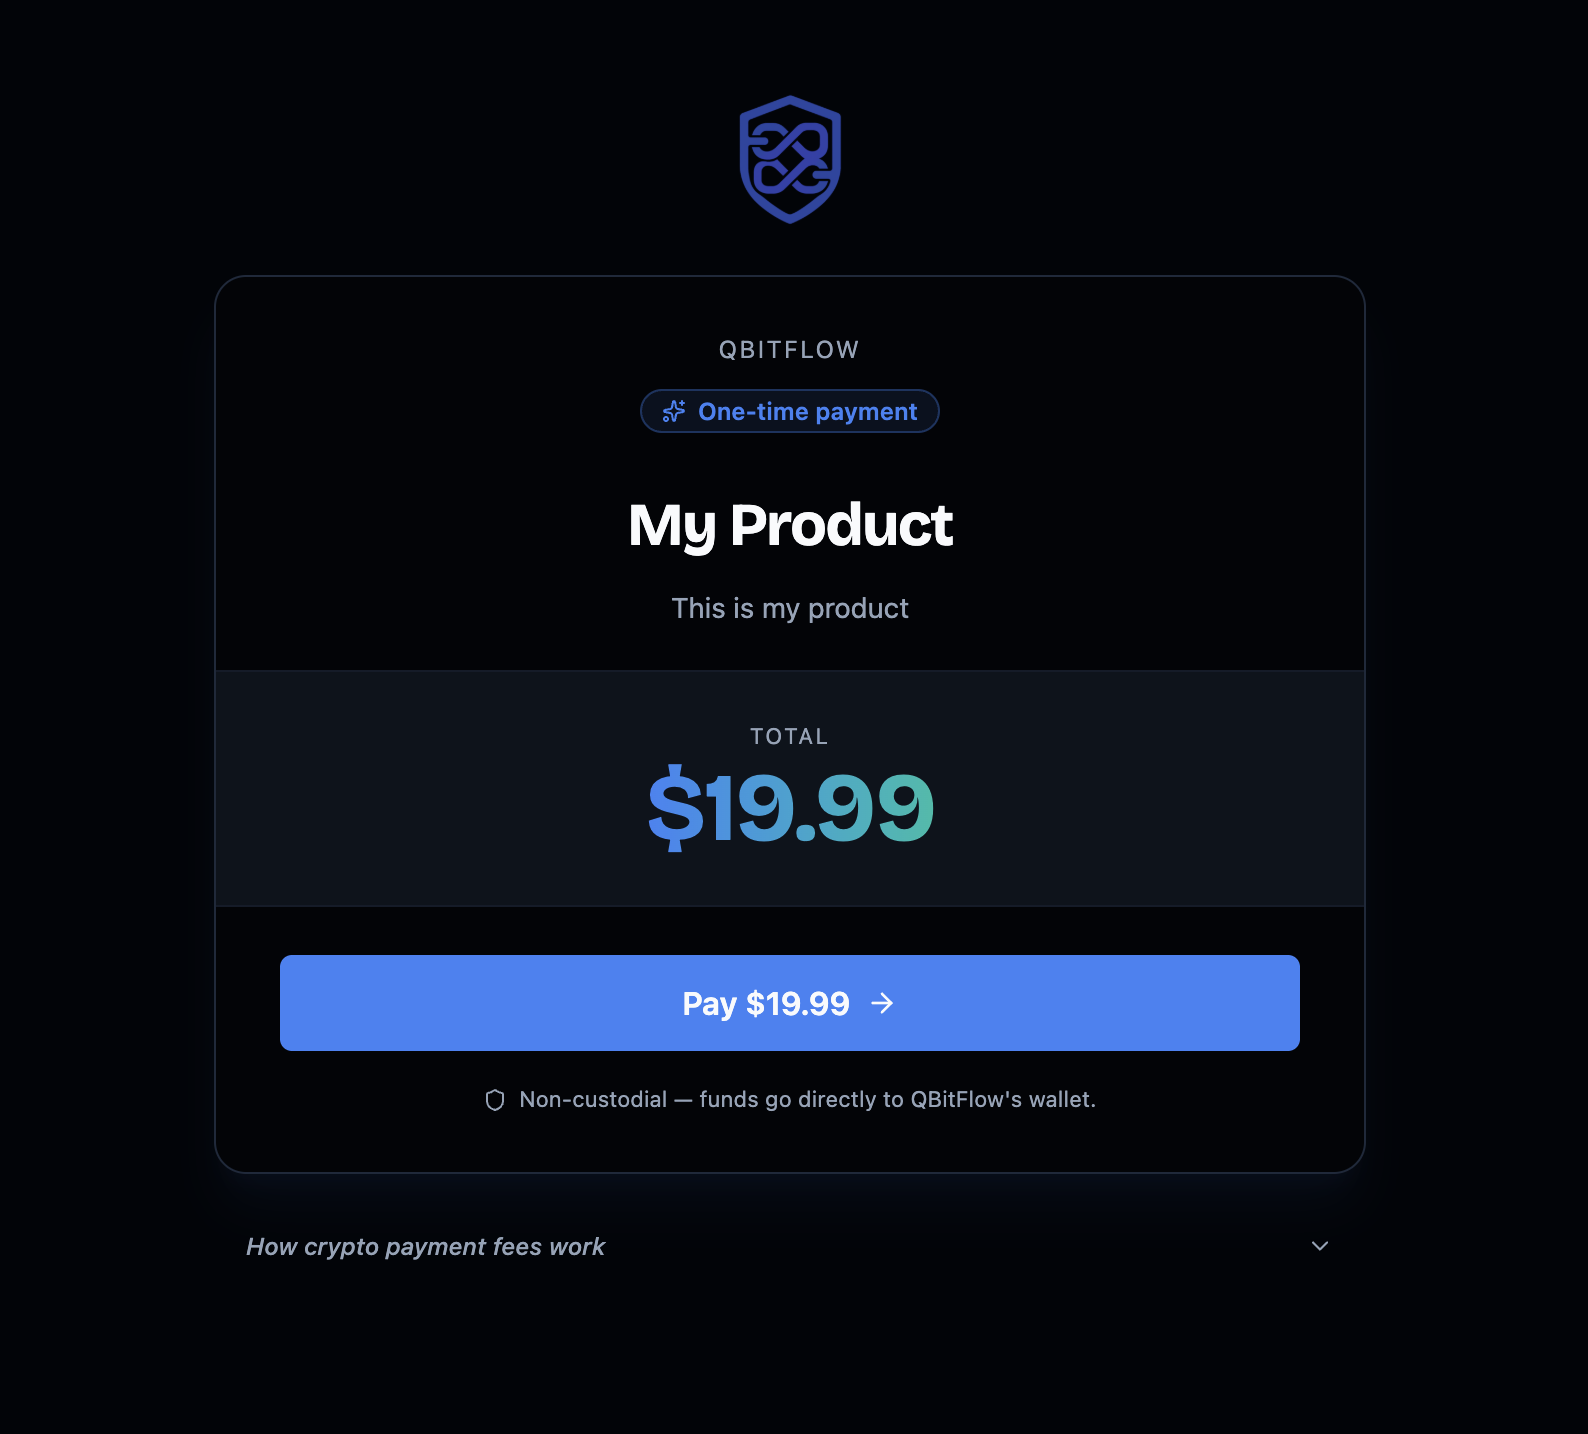
- Pick a chain and a token (use the testnet funds from Step 1)
- Connect a wallet on the testnet (MetaMask switched to Sepolia for Ethereum testing, Phantom switched to Solana devnet, etc.)
- Approve the transaction
- Wait for confirmation (a few seconds on Solana / Base, < 1min on Ethereum testnet)
- You get redirected back to your store's success page
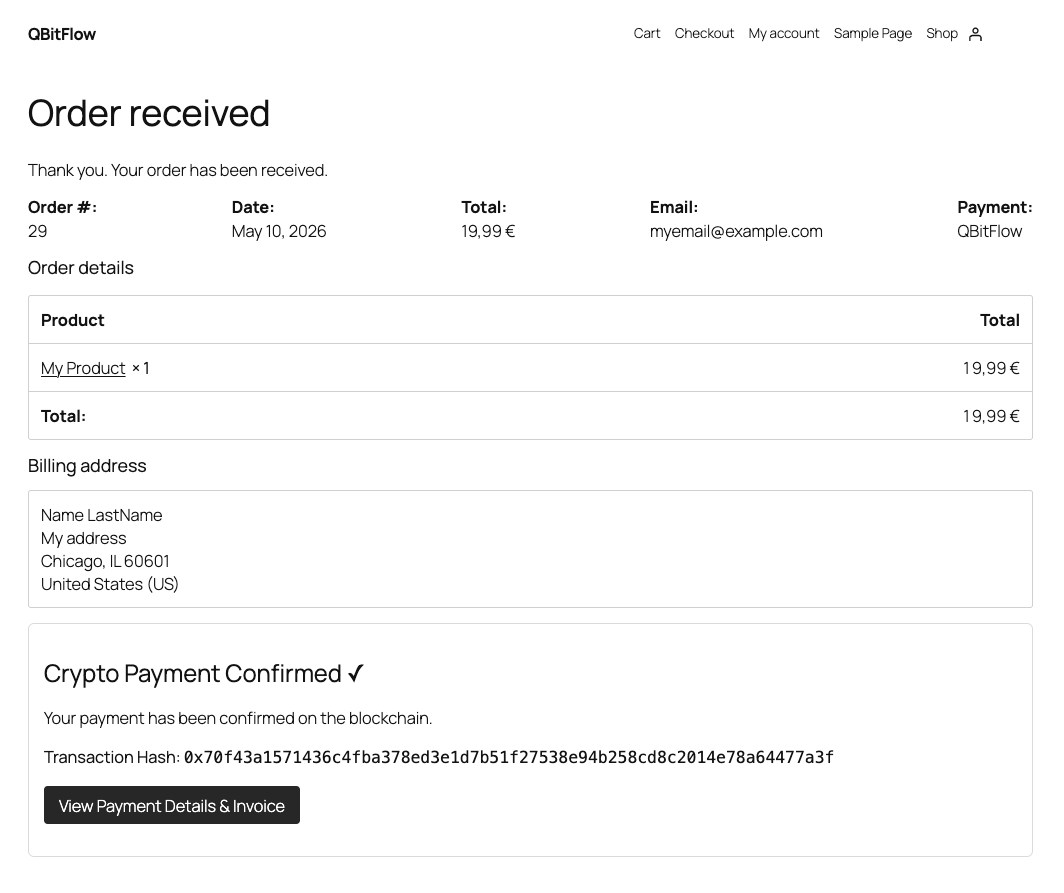
- In WordPress admin, check WooCommerce → Orders — the order should be marked Paid
Step 6: Go live
Once the test flow works end to end, going live is one key swap:
- In your QBitFlow dashboard, go to Settings → API Keys and click Create API Key. This time, select production as the mode.
- Copy the new production key.
- In WooCommerce → Settings → Payments → QBitFlow, paste it into the API Key field, replacing the test key. Save.
That's it. To confirm: place one order in your store and let it redirect to the QBitFlow checkout. If the test mode badge in the top-right is gone, you're live and accepting real crypto payments. (A $1 USDC self-test is a cheap way to sanity-check the full live flow before sending real customers through it.)
Handling refunds
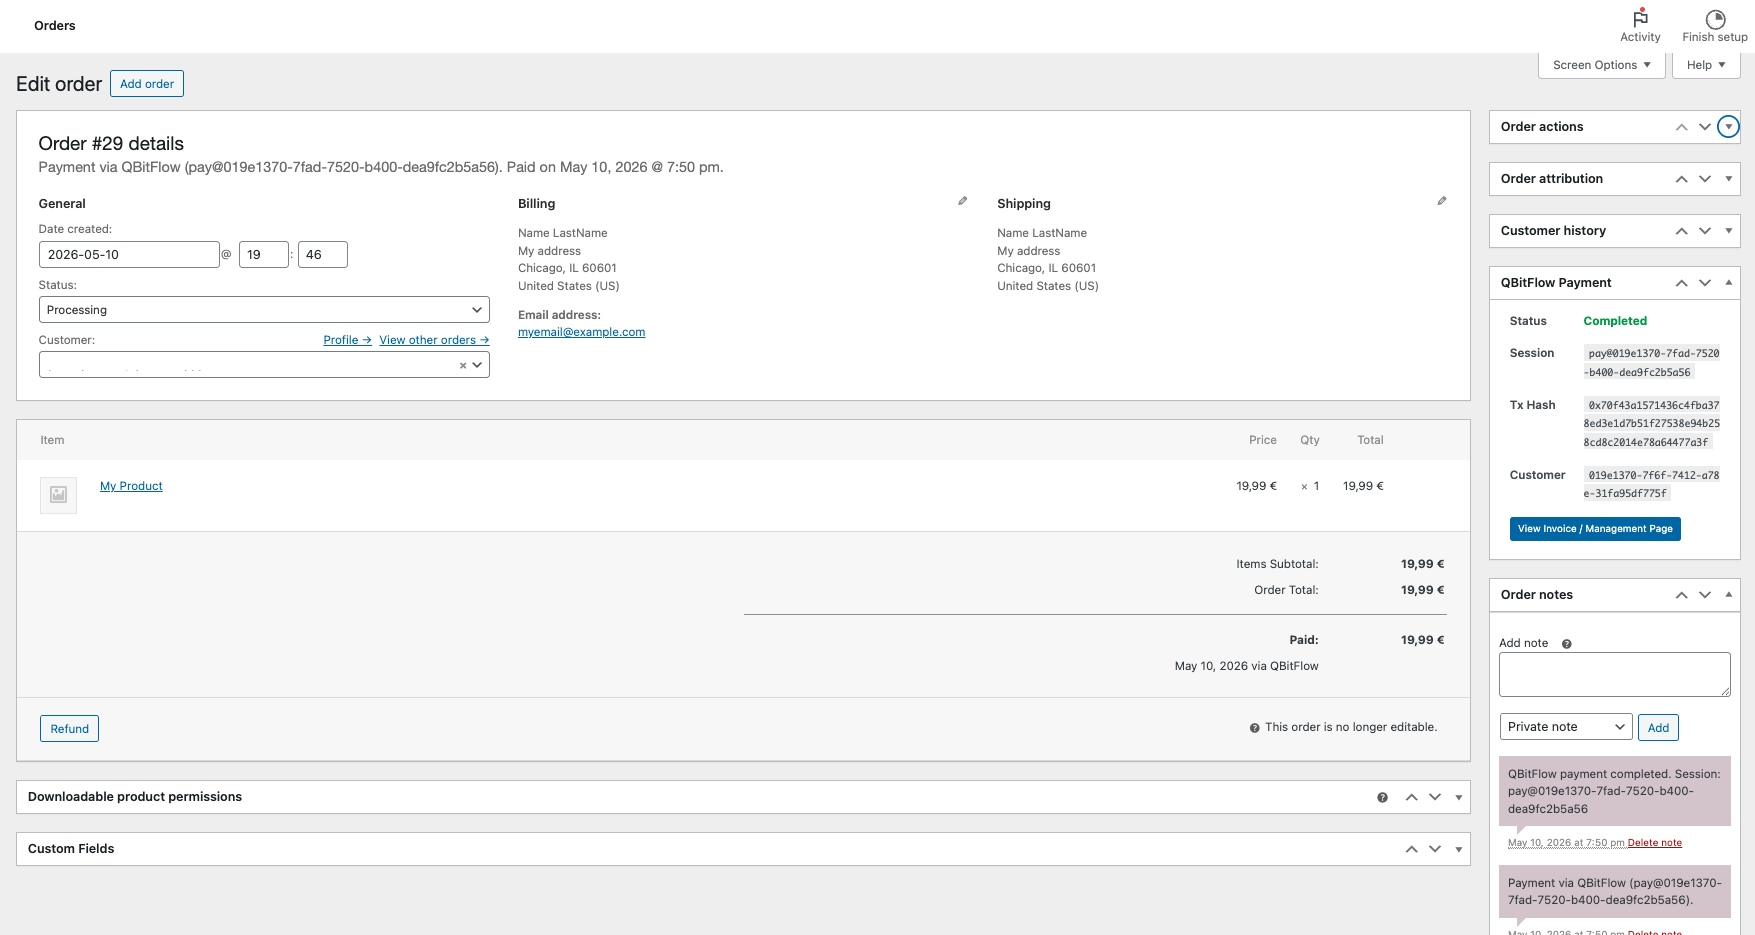
Refunds work end-to-end inside WooCommerce — you never have to leave the order page to push a refund through, and you never have to chase the customer for their wallet address.
The flow:
-
Customer requests the refund themselves. Every QBitFlow payment generates a self-managed payment page the customer can come back to (link in the receipt email + accessible from their wallet history). From that page they file the refund request — reason, no support ticket needed.
-
You get notified inside WooCommerce. A refund-request notice shows up in your WordPress admin against the original order. Clicking it deep-links you straight into the QBitFlow dashboard to the pending request.
-
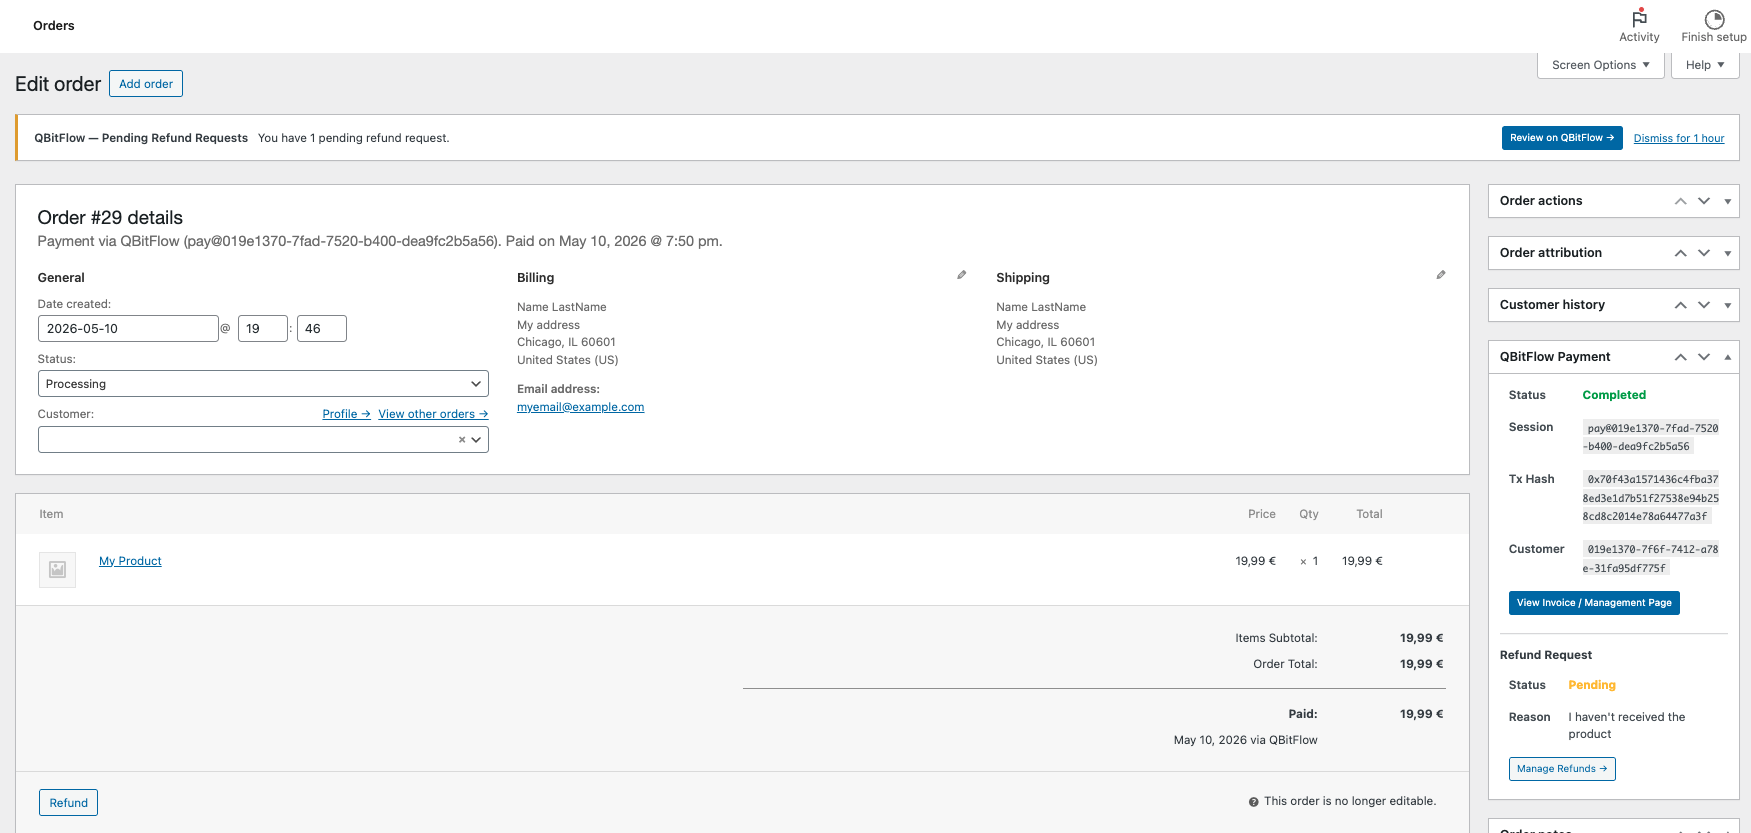
Review and decide. In the dashboard you see the original payment, the amount, and the customer's reason. Two options: accept or reject. If you accept, you sign one transaction with your wallet to send the funds back — same non-custodial model as the inbound payment, no intermediary holding anything. If you reject, you need to provide a reason, and the customer will see it through the self-managed payment page.
-
WooCommerce stays in sync. Once the refund transaction settles on-chain, the order in WooCommerce → Orders → [order] updates automatically — the original payment and the refund both show on the order timeline, so your accounting view is clean and complete.
Customizing the checkout
The hosted checkout page is fully brandable from the QBitFlow dashboard under Settings → Preferences:
- Logo — upload your store's logo
- Theme colors — primary, accent, background — match your WooCommerce theme
Customers see your branding throughout the payment flow, not QBitFlow's. The only QBitFlow surface they see is a small "Powered by" line in the footer.
Going beyond — subscriptions, marketplaces, dashboards
The WooCommerce plugin covers one-time payments out of the box. The underlying QBitFlow platform supports a lot more, and you can wire any of it into your store with a few lines of PHP using our REST API or one of the SDKs.
Subscriptions. QBitFlow supports recurring subscriptions through a spending-cap model — the customer signs one transaction authorizing a maximum amount per period, and the contract bills on schedule with no further customer action. Custom billing frequencies (daily, weekly, monthly, yearly, or custom intervals). Free trials require zero wallet interaction from the customer (no signature, no gas). Subscriptions are token-only — useful to know if you want to bill in USDC or another ERC-20 / SPL token.
Marketplace fee splits. If you run a multi-vendor store (Dokan, WCFM, WC Vendors), QBitFlow supports automatic fee splits on every transaction. The platform's cut and each vendor's cut are enforced at the smart-contract level — no manual reconciliation, no monthly payout job.
Dashboard analytics. Revenue, active subscriptions, customer count, low-on-funds subscriptions, refund requests. Refund requests and required actions are surfaced first in the dashboard, so you never miss one.
Full integration docs live at qbitflow.app/docs. The REST API reference is at qbitflow.app/docs/api. SDKs in JavaScript / TypeScript, Python, and Go cover most languages directly.
What's next
If you followed the steps above, your WooCommerce store now accepts crypto payments on Ethereum, Solana, and Base, at 1.5% flat, with funds settling directly into your own wallet. No omnibus account in the middle. No two-week payout schedule. No chargeback exposure.
A few things worth doing from here:
- Browse the open-source contracts. All payment, subscription, marketplace, and trust-layer logic is on GitHub at github.com/QBitFlow. If you want to read the code that handles your money, it's all there.
- Read the docs at qbitflow.app/docs if you want to extend beyond what the plugin does — subscriptions, marketplace splits, custom checkout flows via the API.
- Tell us what's missing. This is early infrastructure. If something in the plugin is rough, the feedback loop is short and we ship fast.
If you haven't yet, you can sign up at qbitflow.app/get-started. About 30 minutes from there to a live checkout.
Related Articles
How to Accept Crypto Payments on WooCommerce (Without a Custodial Processor)
Your WooCommerce store can accept USDC, ETH, and other crypto today — without handing your funds to a third party, without KYC paperwork, and without waiting days for a payout. Here's exactly how to set it up.
Read more